The Only Bridal Makeup Step-by-Step Guide a Bride Needs to See Before She Gets Married
Headed to your BFF's pre-wedding functions and need to do your makeup yourself? Read this bridal makeup step-by-step guide and get things done like a boss woman! Read on, follow these steps and you’re good to go!

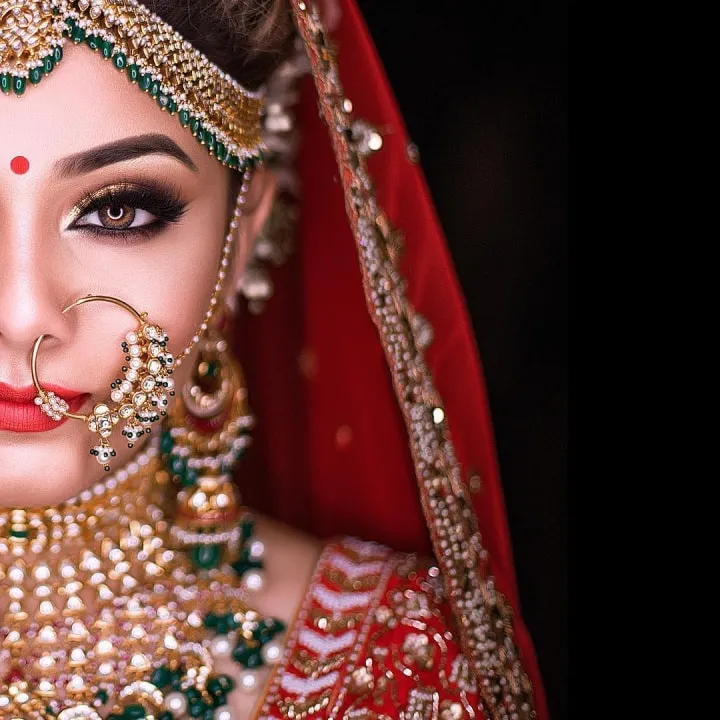

Image Courtesy: The Wed Capture
After the family, it is the bridesmaids who are next in line who need to look stunning to take the wedding functions by the storm. If you happen to be one at your BFF's wedding and don’t have the time to visit a makeup salon then this article is your calling. Follow this breakdown of bridal makeup step-by-step guide and become your own MUA now.
Bridal Makeup Step-by-Step Guide to Do Your Makeup from the Comfort of Your Home!

Follow these bridal makeup step-by-step and put your glam face on point!
Step 1:
Wipe your face with face wipes. A clean and clear skin means a flawless makeup application. The first and foremost important step is to use a mild face wash that suits your skin type. Do not put the face wash on your face directly. Take a small dump on your hands, keep rubbing it till you have a thick foam and wash your wash. Pat dry your face and don’t rub it.
Step 2:
Apply a thin layer of primer to prep your skin for the regime. Take a few drops of primer and put it on your skin over the areas you feel is most discoloured. Using your fingers pat it until its even. Do not use a brush as using your fingertips will ensure the blend is even.
Step 3:
Use a cream-based concealer in an upside-down triangular shape and blend well until it comes close to your skin tone. Ensure you pick up a shade that is maximum one shade lighter than your natural skin tone otherwise you will have a visible white shade that will pop out over and above your makeup
Step 4:
Apply the foundation. To check the shade of the foundation, match it with the colour of your chest. Less is more when it comes to foundations, so use the right amount only! Nailing the correct shade of foundation that looks natural and not made up is a tricky ballpark altogether. In order to find the perfect shade, you must determine your undertone.
How to Find What Undertone Is Yours:

- Warm Undertone: If the base tone of your skin is yellow or gold, then you come under the radar of warm undertones.
- Cool Undertone: If you see hints of blue, pink or red, you come under the radar of cool undertones.
- Neutral: If there's a mixture of both warm and cool hues, or your undertone is the same colour as your actual skin colour, you come under the radar of neutral undertones.
Step 5:
Next in line is the compact powder that helps the foundation set properly. Apply the powder with a blush brush for full coverage.
Step 6:
Then start by defining your eyebrows, go for small strokes and then fill in the gaps in your brow with a colour that matches the colour of your brow hair. Giving definition to your eyebrows will give your face a fuller look and will hold your entire makeup together.
Step 7:

Image Courtesy: Alfaaz Photography
Pick an eyeshadow shade that matches with your outfit and start blending from the corner of your eye to the far-reaching spot of your brow. Also, add some highlighter on the brow bone and shape the same using a white base to give your brows and eyes for definition.
Step 8:
To add the remaining glamour and rise your glam quotient to sky high it is time you use a highlighter. Apply highlighter on the middle of your forehead, basically our T-zone, upper portion of your nose, basically the bridge of your nose, under eye area, across your jawline & under your lips and on the tip of your lips for definition.
Step 9:
Apply the blush in an upward stroke and add a dab of highlighter while you're at it. Remember to be certain about the shade of your blush. If you are planning to go for heavy eye makeup and lip colour, then let your blush be on the cooler side and vice versa.
Step 10:
Apply a thin layer of eyeliner. You can use stencils for the perfect winged look. If not, the key is to make a line on the far end side of your upper lid. Then draw a line following the far end and keep coming inwards until you reach the inner eye. Fill it up using the liner and you’re done!
Step 11:

Image Courtesy: Kulwant Photography
Now apply a waterproof Kajal on the waterline
Step 12:
Use mascara to add volume to your lashes. Use a little pre-heated curler to curl your lashes even more
Step 13:
Once you've moisturised your lips, apply a thin layer of foundation on your lips as it will hold the colour for a longer time. Draw an outer line with a lip colour pencil that matches the shade of your lipstick. Fill it in with the lipstick and allow it the time to set.
Step 14:
Last of the lot, set up your makeup with a setting spray or powder and it will hold your makeup in place for long, long hours!
We hope this bridal makeup step-by-step guide gave you the courage to attempt doing your makeup from the comfort of your home and couch before you hit your friend’s wedding. Follow this breakdown of these bridal makeup step-by-step guide & become your own makeup guru!
Would you follow this bridal makeup step-by-step guide to do your own makeup? Tell us through the comments!


